Difference between revisions of "RISC-V & FreeRTOS"
From spiderboard.org
| Line 4: | Line 4: | ||
* Utility Software (git, make, python) | * Utility Software (git, make, python) | ||
* [http://fpgasoftware.intel.com/?edition=lite Quartus Prime] | * [http://fpgasoftware.intel.com/?edition=lite Quartus Prime] | ||
| − | * A [[Spiderboard_SoM|SpiderSoM]] or MX10<sup>[[Installing OpenOCD#MX10 Hardware Issue|[note]]]</sup> with atleast 8K LE, [[Spiderboard_Baseboard|SpiderBase]] | + | * A [[Spiderboard_SoM|SpiderSoM]] or MX10<sup>[[Installing OpenOCD#MX10 Hardware Issue|[note]]]</sup> with atleast 8K LE, [[Spiderboard_Baseboard|SpiderBase]], optionally [https://shop.aries-embedded.de/tools/pmod/302/pmod-8ld?c=88 LED Pmod] |
* One of the following: | * One of the following: | ||
** [[Installing OpenOCD|OpenOCD]] | ** [[Installing OpenOCD|OpenOCD]] | ||
| Line 69: | Line 69: | ||
<div><ul> | <div><ul> | ||
| − | <li style="display: inline-block;"> [[File:spider-running-riscv-leds.png|x330px|thumb|Spider with LED PMod connected on J2 showing the binary counter.]] </li> | + | <li style="display: inline-block;"> [[File:spider-running-riscv-leds.png|x330px|thumb|Spider with LED PMod connected on J2 showing the binary counter. The LED PMod can be acquired in the [https://shop.aries-embedded.de/tools/pmod/302/pmod-8ld?c=88 shop]]] </li> |
<li style="display: inline-block;"> [[File:terminal_picocom.png|x330px|thumb|Characters written are looped back and displayed.]] </li> | <li style="display: inline-block;"> [[File:terminal_picocom.png|x330px|thumb|Characters written are looped back and displayed.]] </li> | ||
</ul></div> | </ul></div> | ||
Revision as of 14:36, 5 November 2019
Contents
Prerequisites
- Linux Operating System (this guide uses Ubuntu 16.04)
- Utility Software (git, make, python)
- Quartus Prime
- A SpiderSoM or MX10[note] with atleast 8K LE, SpiderBase, optionally LED Pmod
- One of the following:
- OpenOCD
- USB Blaster and Quartus Programmer
Installing VectorBlox ORCA Core and RISC-V Tools
- Download the source from https://github.com/VectorBlox/orca using git.
- This guide uses the install locations /opt/orca/ and /opt/riscv/, you can substitute them if you wish.
- Open a terminal window and run:
- $ git clone https://github.com/VectorBlox/orca.git /opt/orca
- $ cd /opt/orca/tools/riscv-toolchain/
- $ export RISCV_INSTALL="/opt/riscv"
- $ ./build-toolchain.sh
- Info: This may take a while.
- Finally, add the RISC-V tools to your path. Open .profile in your home directory with a text exitor and add the line:
- PATH="/opt/riscv/bin:$PATH"
- After updating the path variable you may need to logout and login again or run the following command in the terminal:
- $ source ~/.profile
Compiling Firmware
- Download the RISC-V & FreeRTOS Example and unpack.
- Then choose either RISC-V or RISC-V & FreeRTOS and run make.
- Open a terminal window and run the commands:
- $ wget ftp://ftp.aries-embedded.de/products/MX10/software/demo/20190604_mx10_spider_riscv_freertos.zip
- $ unzip 20190604_mx10_spider_riscv_freertos.zip
- For the RISC-V standalone demo:
- $ cd mx10_spider_riscv_freertos/riscv
- Or for RISC-V with FreeRTOS:
- $ cd mx10_spider_riscv_freertos/riscv_freertos
- $ make
- This will create the bootrom.mif (Memory Initialization File) in the subfolder out.
- Copy the bootrom.mif to mx10_spider_riscv_freertos/quartus_mx10 or mx10_spider_riscv_freertos/quartus_spider, depending on which module you use.
- $ cp out/bootrom.mif ../quartus_spider

Quartus Prime Project
- Open Quartus Prime and load the project under mx10_spider_riscv_freertos/quartus_mx10 or mx10_spider_riscv_freertos/quartus_spider
- Open Device Settings (Assigments -> Device) and select your FPGA, the default FPGA the MX10 project is the 10M08DAF256C8G FPGA and for the SpiderSoM project the 10M08SAU169C8G FPGA.
- Open Assignments -> Settings -> IP Settings -> IP Catalog Search Locations and add the search path to ORCA.
- If ORCA was installed under /opt/orca/ then type in as search path /opt/orca/**/* and click on the Add button.

- (Optional) Launch Qsys Platform Designer and open qsys.qsys
- (Optional) Under System Contents, double-click onchip_memory2_0 and under memory initialization provide your bootrom.mif file. Per default the bootrom.mif in the quartus folder will be used.
- (Optional) Save and Generate the Qsys system.

- Compile the project and program it onto the FPGA using either OpenOCD or USB-Blaster.
After programming:
- If the red or orange LED on the module starts blinking once per second, the FPGA was programmed successfully.
- If the green LED on the module starts blinking once every two seconds, the RISC-V Core and its firmware is working.
- PMod J2 will output a binary counter.
- You can use the UART of the FPGA by using standard tools such as picocom:
- $ sudo picocom -b 115200 /dev/ttyACM0
- Every character written is looped back and should be displayed on the terminal.
-
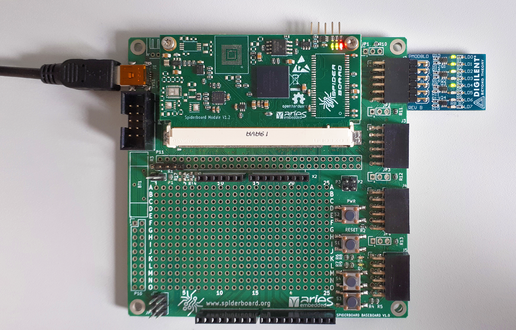 Spider with LED PMod connected on J2 showing the binary counter. The LED PMod can be acquired in the shop

